| Details Lesson by blue |
|
DETAIL TUTORIAL In dolling, no matter how much time you spend on the clothing in a particular piece, it's frequently the details that end up making the difference between something 'good' and something 'amazing.' One of the easiest ways to make a doll your 'own' with finishing touches is to change the eye/skin color -- or, if you feel up to it, to even reshade the base or do face edits. However, if that seems intimidating, here are a few other ideas for things you can add to your doll. This tutorial covers the following:
Non-repeating patterns Most dollers are familiar with the idea of repeating patterns, so I'm not going to be covering those in this particular tutorial. Instead, I want to discuss the often-overlooked non-repeating patterns. 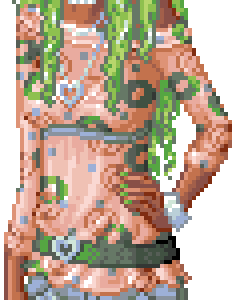 base This is a variation on the standard repeating-pattern-deal -- except that instead of actually repeating a set piece of the pattern, I put each element on its own layer, scattering them about at random. As a result, the pattern looks less stagnant and more wild and bold. 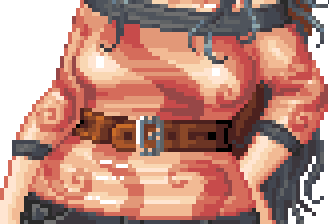 base This is a hand drawn pattern; there are no repeating elements at all to it, it was all drawn in to suit the shape of the garment and the body beneath it. Patterns like this help bring emphasis to different parts of the body as desired, or to encourage a flow of the eye from one area to another. 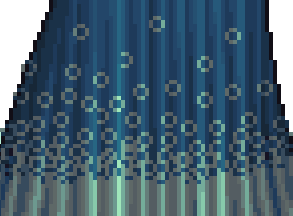 base I'll admit, this is one of my favorite sorts of pattern. I like to call it a pattern-fade; I created the little circle and then pasted it about a hundred times on a fresh layer; more toward the bottom, fewer and farther apart near the top. It creates a very cool almost-dithering effect. 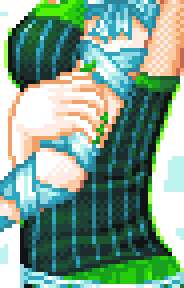 base The last kind of pattern I want to discuss is stripes. I am of the opinion that stripes and pinstripes should NEVER be copied and pasted, but should always be drawn on by hand. This is because the shape of the stripes is defined by the way the cloth pulls across the body. Breasts, for example, warp the line of the stripes in a very predictable way - they curve and swell with the curve and swell of the flesh beneath. ------------------------------------------------------------ Trim I find that trim can often spice up an unexciting article of clothing; especially dresses and simple shirts. The bustline, the ends of sleeves, the bottom of a skirt...these are all areas that could use some trim. However, these are also all areas that are not straight across; it's important to follow the lines of your fabric when adding trim to an article of clothing.  base  base  base ------------------------------------------------------------ Seams I would go so far as to say that seams are not only a nice detail to add to a doll but that they are, in fact, a NECESSARY detail in quite a few articles of clothing. Most garments are not made of one continuous piece of cloth; as a result, there are places where two pieces of fabric are stitched together. In these places, a seam should definitely show up. To mimic the way a seam works, I usually add a dark line of shading beside a light, dithery sort of hilight. This is to mimic the shadow that's the connecting point [dark] and the thread going in and out to bind it together [light]. However, not all seams are made the same way, and sometimes they show up differently! 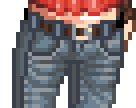 base Jeans are one of the MOST IMPORTANT places to show seams. Most jeans have a very clear seam along the outside of the pants AND the inside [though there are some that have the seam long the front and back of the pants, which might be a fun thing to experiment with.] There are also frequently seams along the lines of the pockets, and also the fly. All of these are good details to add to your denim-clad doll. 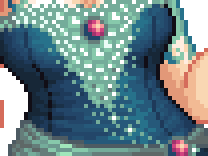 base This is a different kind of seam, more decorative. When creating your doll, don't just think about how the fabric falls; think about how it's held together, how the pieces fit together, how it was constructed, and try to play with that. Little things like this help to bring realism to a piece. 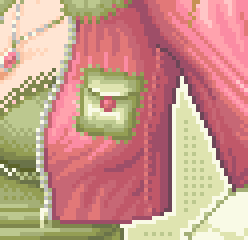 base This is just to show more clearly the dark-beside-light way that I create seams. ------------------------------------------------------------ Pockets A lot of clothing has pockets in it -- because humans like to carry stuff with them! When adding pockets, it's generally important not to make them look too pillow-y. Most pockets lie flat unless there's something inside them, so they shouldn't look 'puffy'.  base Once again, I start with jeans, because pockets are such an important part of them. They're simple, should basically lie flat, and just be a shadow along the inside unless there's something inside of them.  - - 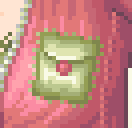 base - base Some other pocket examples.  base And for the sake of example -- here's a jacket pocket that's empty. It mostly falls flat against the body, only the outlines marking it for what it is. ------------------------------------------------------------ Tattoos, Markings, Makeup If a lot of skin shows on your doll, you might consider adding a tattoo; or on portrait bases, frequently makeup really adds something to the overall piece, bringing some personality to your creation. 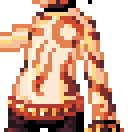 base When I make tattoos, I generally create a new layer and draw the tattoo on there flat color -- then copy the skin tone from beneath and recolor it to fit the tattoo. The IMPORTANT THING about tattoos is to keep them relatively flesh colored. No matter how brightly inked a tattoo is, it still retains some of the color and feel of flesh beneath it. Keep your tattoos low contrast, and try to carry over some of the hue of the skin.  base Freckles are a seriously underused tool in pixel art. They are adorable, and easy; just add some dots of darker skin color across the bridge of the nose and the cheeks and voila! 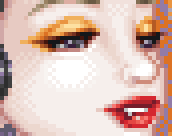 - -  base - base Again -- with makeup, be careful to retain some of the flesh color in your creations. Don't go too high contrast, try to keep your palettes similar to your skin color, and AA is always your friend! ------------------------------------------------------------ Zippers Hoodies, jackets, shoes, pants -- zippers pop up in all sorts of places. They're a neat detail to add along seams, and help to polish off a doll. When I make zippers, it's similar to the way I make seams; alternating light and dark pixels, shaded brighter or darker according to the light source. On bigger dolls, I do two rows, to simulate the teeth and where the teeth connect. On smaller, it's just a scattering of pixels. Oh, and of course -- don't forget the zipper pull!  - -  - - 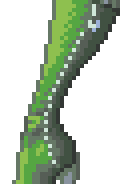 base - base - base ------------------------------------------------------------ Eyewear [aka: glasses] Let's face it. A LOT of people [such as the wonderful, fabulous, amazing BLUE] wear glasses on a day-to-day basis. It's nice to add them to some of your dolls, because -- well, dolls are people too!  - -  base - base I have a pet peeve when it comes to glasses. Most people doll them much too high up on the face. I wear glasses every day, and I know that they don't cover the eye the way most people pixel them. Instead, I say that glasses should sit just above the nostrils of the nose, because THAT IS WHERE THE EYEPIECES HIT. That's how glasses stay on your face. So here are my important suggestions when it comes to dolling glasses: leave some of the eye visible above the top of the frames; add white hilights across the glass, where the light hits; keep the frames 1 or 2 pixels wide, unless they're EXTREMELY thick glasses, and AA them to the skin so that they don't look scratchy and pixely. 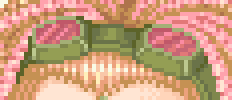 base And here are some goggles, because I like goggles. Nothing else to say, feel free to examine. ------------------------------------------------------------ Jewelry I'm of the opinion that jewelry is largely instinctive. It's a lot of dangly things, gems and metal and whatnot. So I just have a few pointers. Metal is extremely shiny, so it's important to have a lot of contrast; I generally use white hilights when playing with metal, and very dark shadows right next to them. Gems are also very shiny, usually, so high contrast is important here, as well -- as is remembering that they're usually SET in metal. Hue shifts help brighten gems up as well, and keep them interesting. Finally, adding just a one-pixel wide hanging bit on small or medium dolls really makes jewelry look interesting and complex.  - -  - - 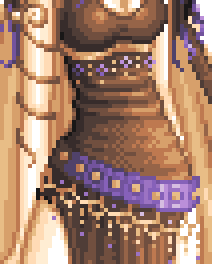 base - base - base ------------------------------------------------------------ Lace and Fishnet I am a firm believer in hand-drawn lace and fishnet. Too many dollers rely too heavily on pre-made patterns and textures, basic repeats such as dithers as well as flat colors. Sometimes, it's okay to use flat color in a piece -- but unless it's for stylistic purposes, it's always better to shade your lace and fishnet. 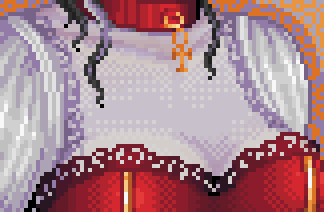 - -  base - base When I create lace, it's generally a random scribbling of the mouse, outlined carefully around the edges, with strategic gaps and empty spots. There is no rhyme or reason to my lace; I zoom in and zoom out until it looks how I want it to look. 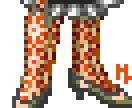 base Sometimes, almost exclusively on REALLY SMALL DOLLS, I'll use a pattern to create my lace. It has to be something that's mostly gaps, with lots of empty space in between through which the skin shows. Phoenix has some advice of her own on fishnet: Fishnet stockings (or gloves, or shirts, or whatever) are more than simply flood-filling a region with 50pt. dither! Fishnet is a fabric, even though it's made up of less material and more open space. Therefore, it pulls and adheres to the body in the same manner any other fabric would, and thus it's usually better to hand-draw it. First, draw your diagonal lines in ONE direction, taking into consideration that the fabric will not simply lay flat around a pillar-like leg, it will curve around it. Then draw the other direction, assuming the same thing. At the knee or elbow the fabric will naturally bunch, and thus the lines should become closer together to result in a smaller fishnet pattern. 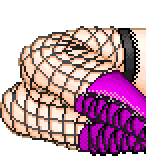 - -  base by Charli - base You might also note that she always shades UNDERNEATH the line of the fishnet. This helps give dimension and shape to the lines of the netting. ------------------------------------------------------------ Hair streaks/Hilights/Tips I admit. I have an obsession with multi-colored hair. I frequently add hilights, or colored tips, or fades, to the hair that I create. I like the punky feel it can add to a doll, and the way it spices her up. When I add streaks, generally I shade the hair in its entirety in one solid color and then create a new layer. I draw the streaks in, flat color, following the lines of the hair, and then copy the hair layer and color change to add the new streaks. When putting streaks in your doll's hair, try not to make the difference in color TOO great between your two shades. Or, if you do, be sure to AA the two together to make the blend look smooth and natural. 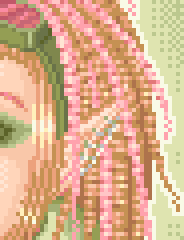 - - 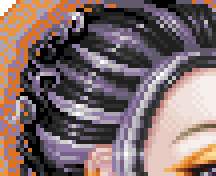 - - 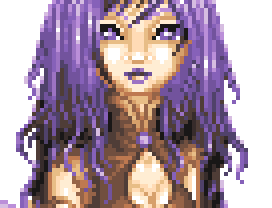 - - 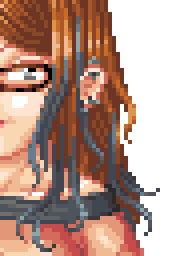 - - 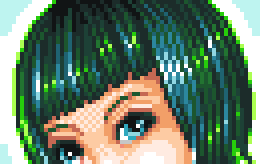 base - base - base - base - base ------------------------------------------------------------ Fingernails Fingernails are another frequently overlooked detail, and one that I absolutely adore. It's so easy to add colored nails to a small or medium sized doll -- they're just a pixel or two wide, nothing fancy or strange! They just add a splash of color and make it look like your doll has really put herself together. (: 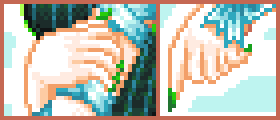 base 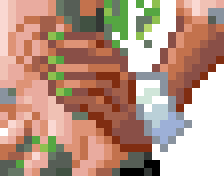 base ------------------------------------------------------------ Tears The last stage of my tutorial is rips and tears! I only have one good example at the moment -- because these are clearly something I don't use enough. I don't have a lot to say about tears, just a few pointers. Generally, when fabric is ripped, it doesn't rip NEATLY; because fabric is woven, it results in fraying around the edges that should appear as a ragged edge. Also, tears usually follow the shape of the fabric, the way its woven, and this is generally either horizontally or vertically -- so be sure to reflect this in your work! And last of all, always be sure to put some shading under the tear, on the layer beneath, to give it that extra, added volume. 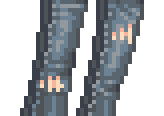 base |
